
Getting perfect skin tones can be quite time consuming and difficult. Because everyone’s skin complexion is different, the corrections needed will be different every time. Even so, there are some recurring problems such as over-saturated reds in darker tones. A great makeup goes a long way in helping with redness, but sometimes it is not enough. The best example is the red seen in the ears when the model is backlit. Because of the nature of skin and the human body, the ears are going to turn red and no makeup will totally solve that. So let’s see how we can correct that very effectively and quickly using Photoshop.
Perfecting Skin Tones Using the Hue/Saturation Adjustment Layer
Most of the time, reds are found in the darker tones of the skin, but sometimes it can be tricky to judge exactly which areas of the image are over-saturated or not. To make it easier, I am going to show you a technique to correct the over-saturation of the reds in a very visual way.
First you need to create a blank hue/saturation adjustment layer (Layer > New Adjustment Layer > Hue/Saturation) and go into the Reds channel.

Then push the saturation of your reds channel to the maximum. This is going to help you select the zones of the image you want to correct. Your image is probably going to look awful at this point, but don’t worry, we are going to make it look awesome. Here is my sample image at this stage:

In the properties panel of your hue/saturation adjustment layer, you will find different sliders. The three main ones allow you to control the hue, the saturation, and the lightness of the active channel. Then the two sliders below the colorize checkbox will let you select how much and what hue you want to adjust. Each of these two sliders have two cursors. The slider on top lets you feather more or less the hue range selected. The second slider lets you choose the hue range you would like to affect with your adjustment. Here is a look at how I moved the cursor for my sample image and how the picture looks now with this adjustment made:
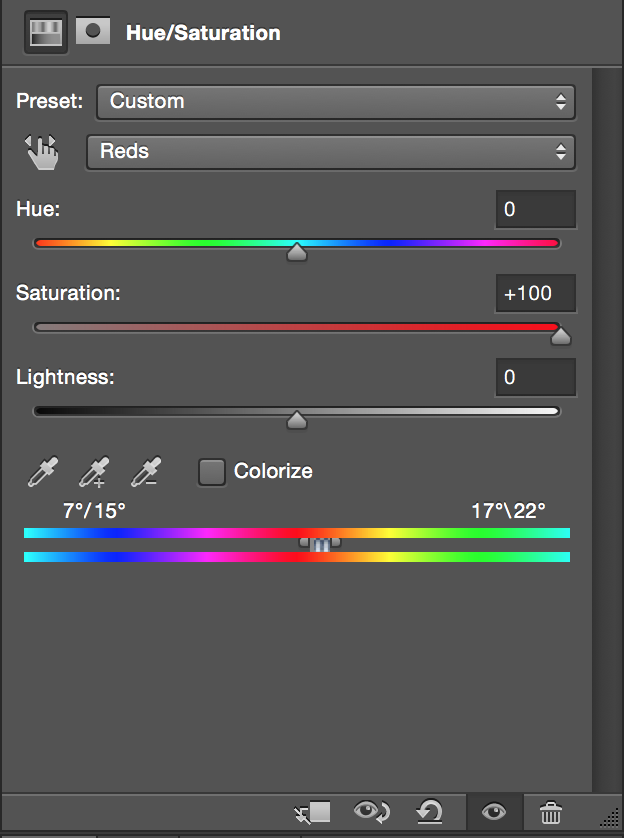

As you notice, by moving the cursors I have restrained the areas affected by my adjustment. Because we pushed the saturation to the maximum in the reds channel, the hue range selected is visible in (way over-saturated) red. For example, here I see that the cheek bones and the inside of the ear will be affected by my adjustment layer as they are red unlike the teeth or the highlights.
Now that the hue range is refined, you just have use the saturation slider to desaturate the reds until it looks good to you. Don’t forget as we pushed the saturation slider to the maximum, getting a slightly desaturated red means having a saturation value that is less than 0. Be careful not going too much below 0 or you will end up with a grayish skin tone instead of a natural looking one.
If desaturation is not doing enough for you, you can push the hue slider a little bit towards the right to get more of an orange color. That way you can “neutralize” your reds without having your model looking like a zombie. Keep in mind that when retouching, a little bit goes always a long way, so don’t go crazy with the adjustments. For example, on my sample image I moved the saturation slider to -5 and shifter the hue to +4. Let’s see the before/after to check the difference this adjustment made:


As you can see, the adjustment is quite subtle. You may have also noticed that the lips got a little bit warmer/more orange which might not be desirable. But what is great with this technique is that as we are using an adjustment layer which is non-destructive. We can always go back and refine the hue range selected, desaturate our reds more, or simply use the mask on the layer to make the adjustment more local. In this case I would probably mask out the adjustment on the lips so that they keep a more natural red look. I would also totally remove the adjustment from the eyes to avoid having the tear duct looking weird and the iris shifting color.
This technique was shown to me quite recently by the great French photographer and retoucher Felix Barjou. Since then I’ve used it on almost every single one of my pictures. The way this technique works makes it really easy to get an accurate result unlike many other color neutralizing techniques. Best of all you can tweak it a bit and make it work with any color or even multiple colors. No matter the skin complexion you are up against, you can use it to correct color problems in just a few clicks.
Finally, if you are not sure about the color that needs correction, you can always use the color picker (the small hand button next to the channel selector) to get an approximate reading of the zone you want to correct and then adjust the settings from there.


